
Get Started with Kin No-Code
The Kinetic Plugin is a powerful tool that lets you work directly with Kin on the Solana blockchain.


Kinetic Bubble Demo
Check out a simple demo app built on Bubble that can interact with Kin on the Solana blockchain.
Behind The Scenes
Check out the workflows, conditional logic etc used to build the Kinetic Bubble Demo app.
Building your own app on Bubble with the Kin Kinetic Plugin is incredibly straightforward. Just follow the steps below to start transacting with Kin in your app.
Create an app on Bubble.io
First, register / log in on bubble.io
Bubble
Bubble is a No-Code development platform, that lets non-developers build feature-rich applications.+
Then create an app. Give it a name, description, etc. Bubble has a nice app creation wizard you can follow if you'd like.
If you get stuck at this point, you'll probably want to check out Bubble Academy to get some pointers. There are some great tutorials for beginners that will help get you up to speed with what Bubble is and how you can build an app with it.
Add the Kinetic Plugin
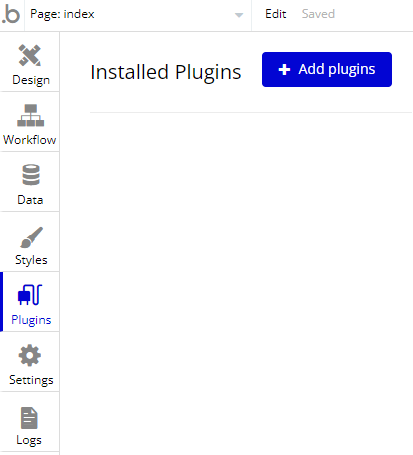
Once you've created your app, you'll see a menu on the left hand side. Choose 'Plugins'. Then, 'Add plugins'.
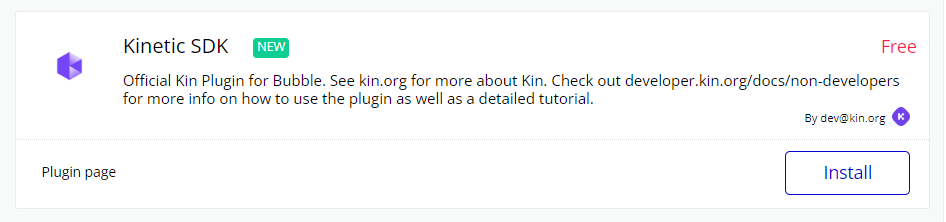
Search for 'kinetic', then 'Install' and 'Done'.
Configure the Kinetic Client
The Kinetic Client is what will allow you to interact with Kin on the Solana Blockchain.
Let's get it set up correctly.
Go to 'Plugins' and you'll see some details about the Kinetic plugin that you've just installed, as well as some options we can fill in.
These 'Actions' are the things that the Kinetic plugin can do.
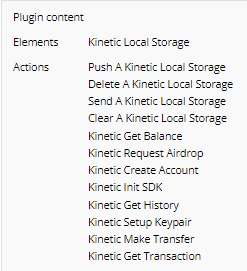
The main actions we care about are the ones explained in-depth below.
In terms of settings, lets keep it simple for now so we can get up and running as quickly as possible.
Kinetic Plugin Devnet Settings
We want to make sure stuff works on the Solana test environment before moving to the 'mainnet'.

- set your 'endpoint' to
https://sandbox.kinetic.host - set your 'environment' to
devnet - set your 'index' to your App Index (Or just use '1' for now to get started, see below for details...)
- set your 'commitment' to 'Confirmed' or leave it blank. Learn more about commitment here.
Don't have an App Index? Register your app on our Developer Portal so you can get your App Index that allows you get credit for your transactions and earn via the KRE.

Register Your App
Learn how to register your app on the Kin Developer Portal

Kin Dev Portal
Go straight to the Kin Developer Portal and get started
Until your app has been confirmed approved by us on Discord for use with Kinetic, please just use 'index = 1' so you can get started.
Let the fun begin!
Initialize the Kinetic Client
When your app loads we want to 'Intialize the Kinetic Client'. Basically, this means we want to turn on the plugin and make sure it's connected to our Kinetic network correctly.
To do this:
- Go to 'Workflow' on the left-hand menu and add an event for when the page is loaded.
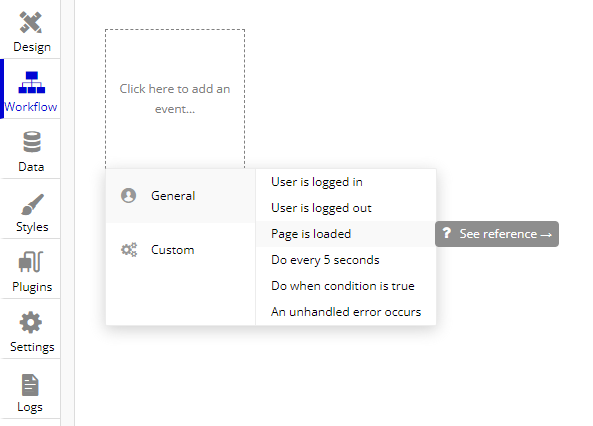
- Then, add an action via
Plugins / Kinetic Init SDK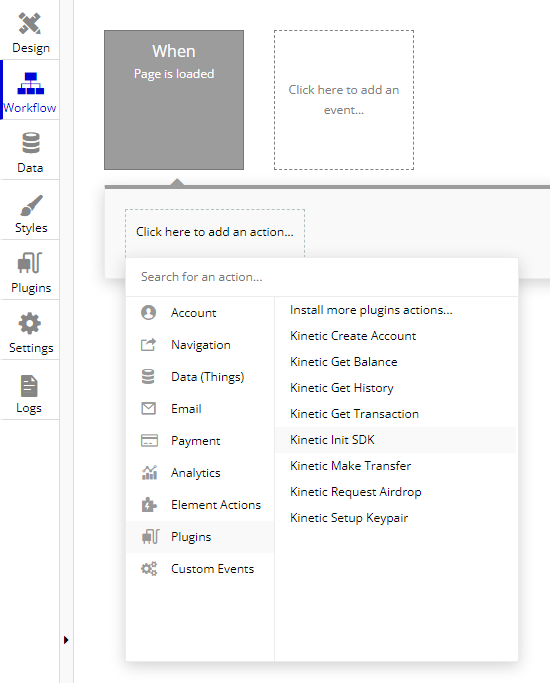
- Now, click 'Preview' in the top menu

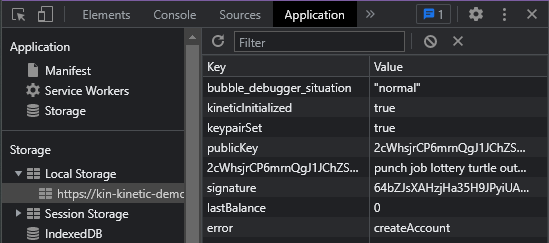
- You'll see a blank page. Open the developer tools (
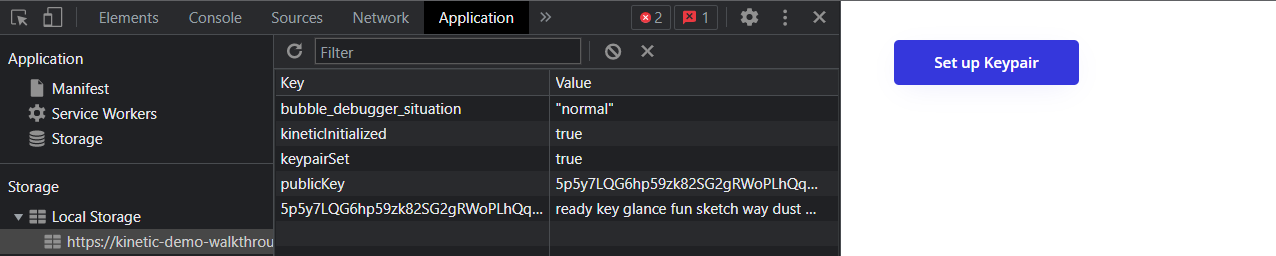
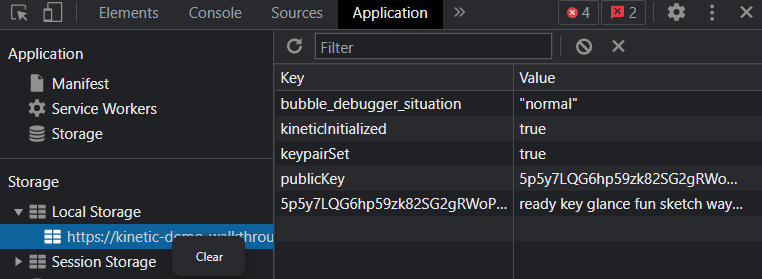
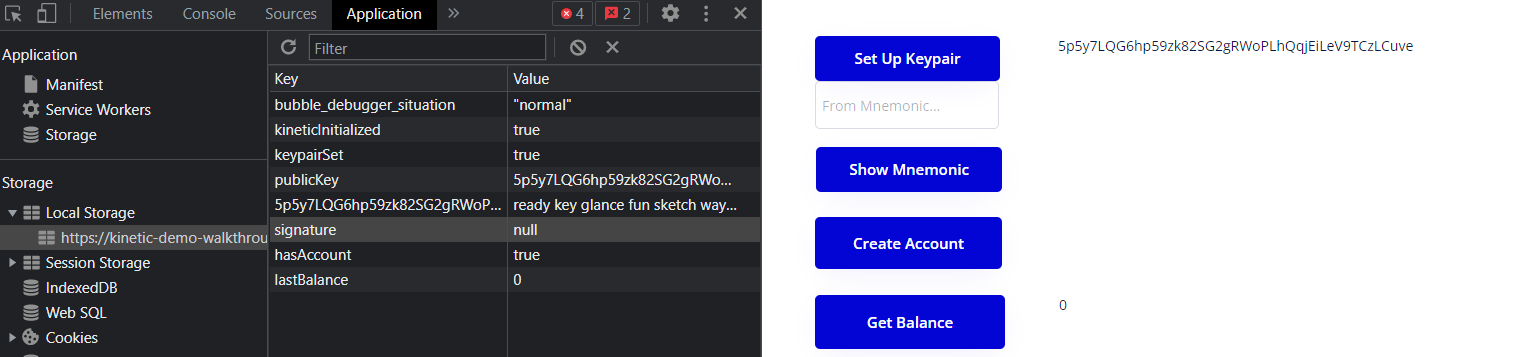
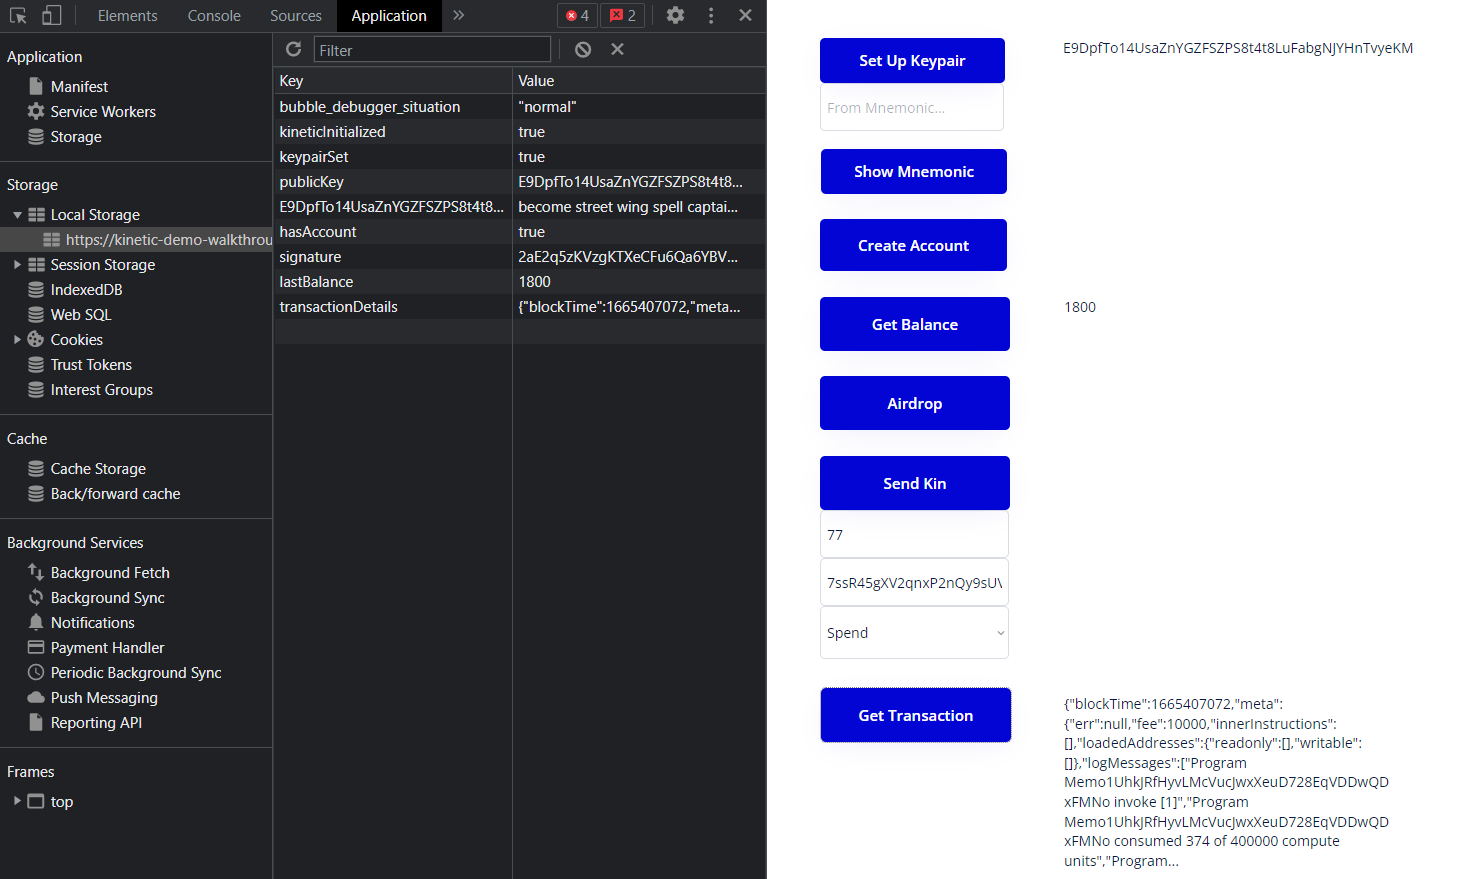
ctrl/shift/iorcmd/shift/i) and select 'Application' this will show you your 'Local Storage'. Select the option for your bubble preview and you should see some values there.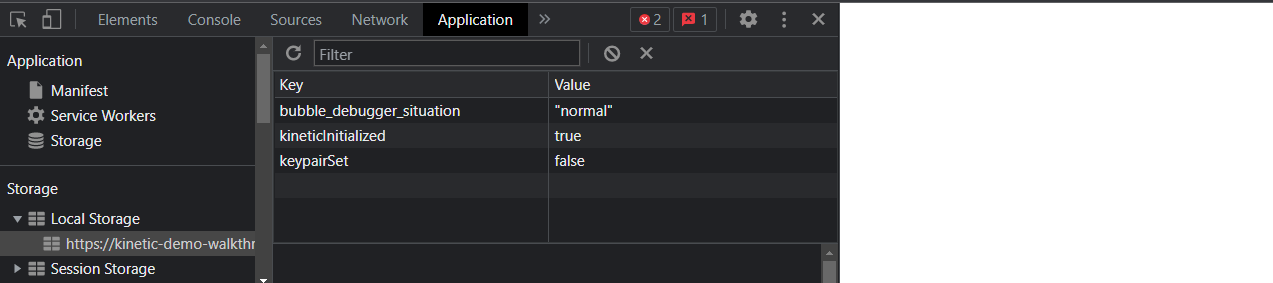
You should see kineticInitialized = true and keypairSet = false.
This is because the Kinetic Plugin uses Local Storage for keeping key bits of data that come back from our Kinetic network.
Anything in Local Storage will only last in that specific browser and until the browser is cleared. But, you can close the browser and reopen it and keep the info that's stored there.
kineticInitialized = true means that you are ready to create an account!
Create Account
Creating an Account is a two step process.
- Create a Keypair which is consists of:
- a public key that is an address that people can send Kin to. It's safe to share this.
- a private key that is used to sign transactions in the browser. This signing is handled by the plugin. It is not safe to share this. Someone with your private key can get access to your funds.
This keypair can be generated fresh or from an existing mnemonic phrase. We'll show you how to do this in a moment.
- Create an Account on the blockchain with your Keypair.
Let's get started...
Set Up Keypair
- Go to 'Design' and drag a 'Button' onto the blank page. Rename it 'Set Up Keypair'
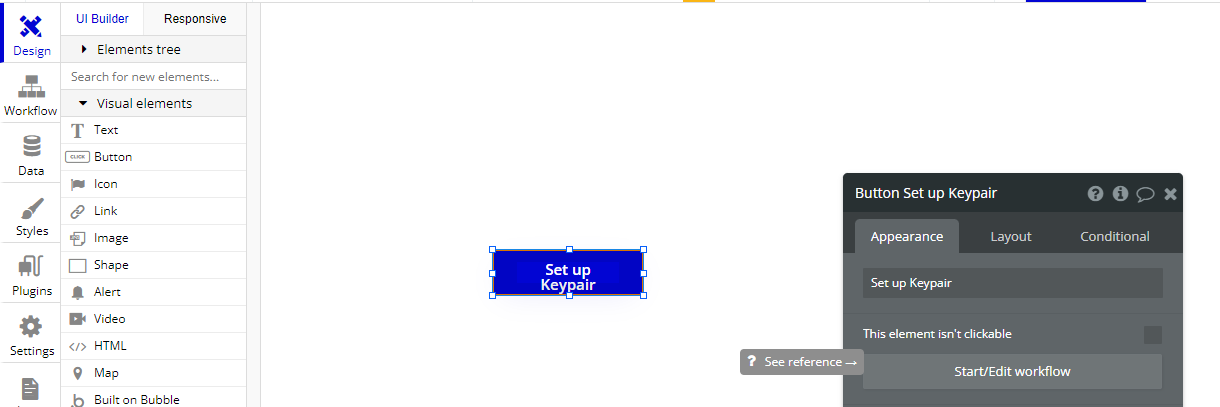
- Click 'Start/Edit workflow' and add an action via
Plugins / Kinetic Setup Keypair
- Reload your 'Preview' and you'll see your new button on the screen. Click 'Set up keypair' and you should see your new Keypair appear in your Local Storage.
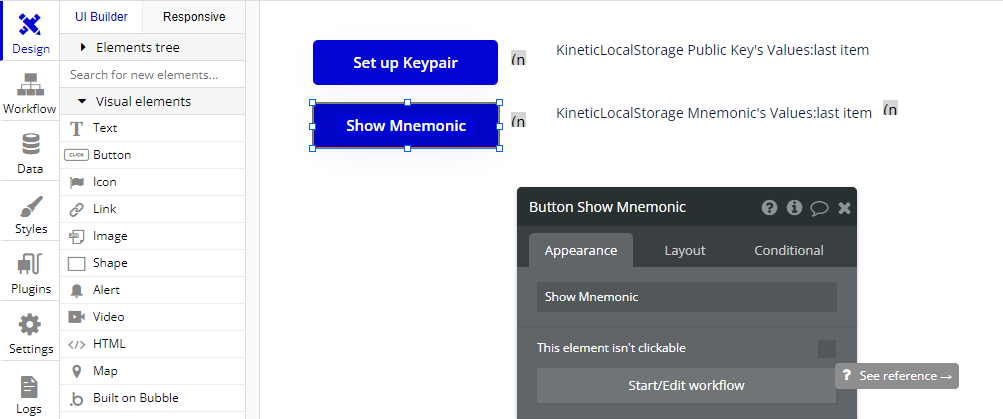
Show Your Public Key
Lets display the Public Key on the screen for the user.
- Go to 'Design'. Grab a 'Kinetic Local Storage' from the side menu and drag it next to the 'Set Up Keypair' button. Rename it to
KineticLocalStorage Public Key
- Grab a 'Text' element and place it next to the 'Kinetic Local Storage'. Rename it to
Text Public Key. Click on '...edit me...' under the 'Appearance' tab, then 'insert dynamic data'.
- Set your Dynamic value to
KineticLocalStorage Public Key's Values:last item.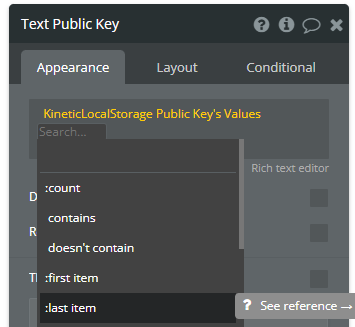
- Finally, go to your 'Set Up Keypair' workflow, and add an action via
Element Actions / Push a Kinetic Local Storage. We are going to push the value of the publicKey in Local Storage into our Kinetic Local Storage element which will allow us to display the value. We'll be doing this with any information the Plugin returns from the Kinetic server that we want to display on the screen.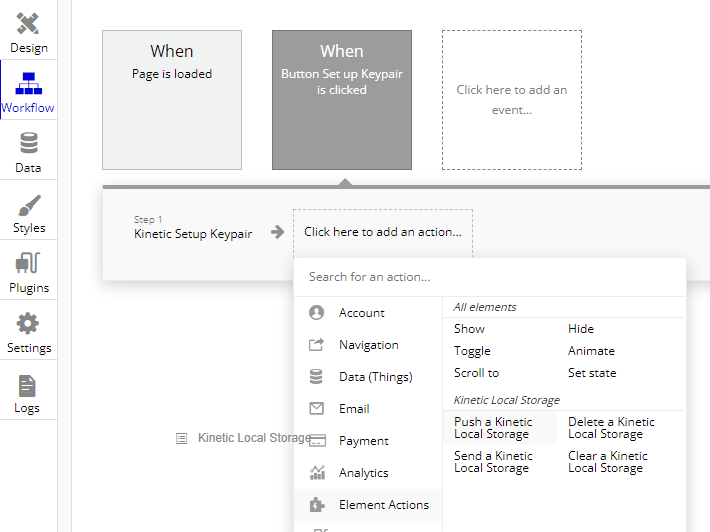
- Set the element to
KineticLocalStorage Public Keyand in keys putpublicKey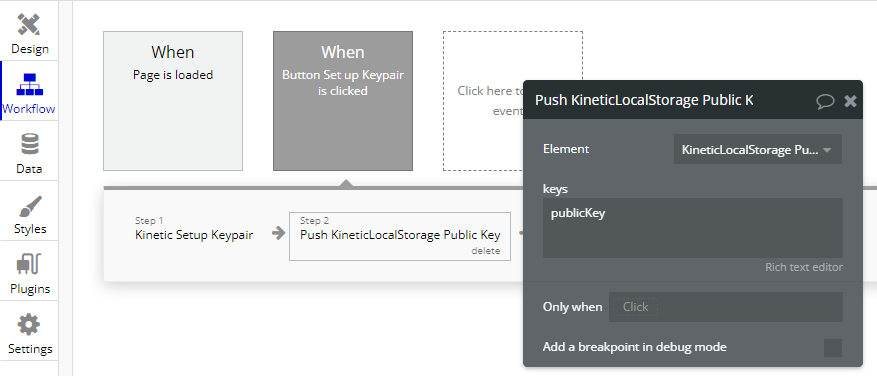
- Reload your 'Preview', click 'Set up Keypair' and you should now see your public key next to your button!

View Mnemonic
Now we want to make it so that a user of the app can view their own mnemonic so they can keep it somewhere safe. That way, we can re-use the mnemonic to make their Keypair instead of having to make a new one.
-
Go to 'Design'. Add a new 'Button' called 'Show Mnemonic'.
-
Grab a 'Kinetic Local Storage' from the side menu and drag it next to the button. Rename it to
KineticLocalStorage Mnemonic. -
Grab a 'Text' element and place it next to the 'Kinetc Local Storage'. Rename it to
Text Mnemonic. Click on '...edit me...' then insert dynamic data. -
Set your Dynamic value to
KineticLocalStorage Mnemonic's Values:last item.
-
Click your 'Show Mnemonic' Button and then 'Start/Edit workflow'.
-
Add an action via
Element Actions / Set state.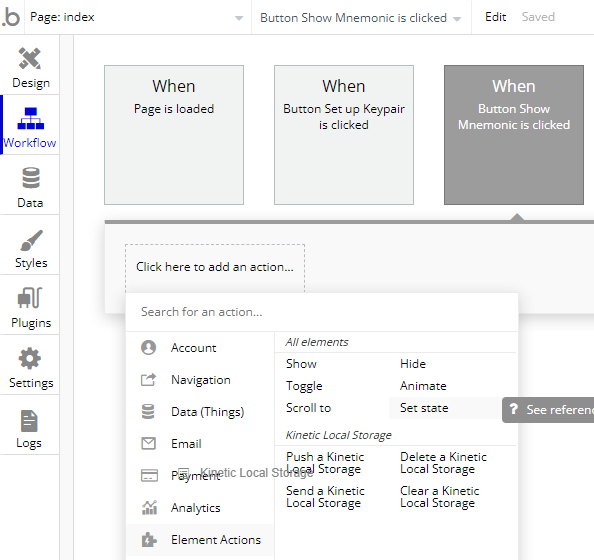
-
Set your element to
Button Show Mnemonic. Create a new custom state calledShow Mnemonicand a type ofyes / no.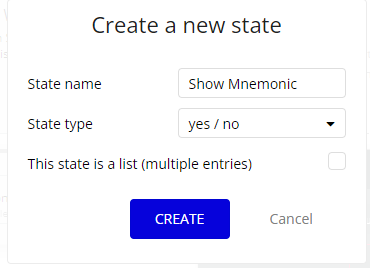
-
Set your value to "yes".

-
Go to your 'When Page is loaded' workflow and add an action via
Element Actions / Set state. Set the element toButton Show Mnemonic, the custom state toShow Mnemonicand the value tono.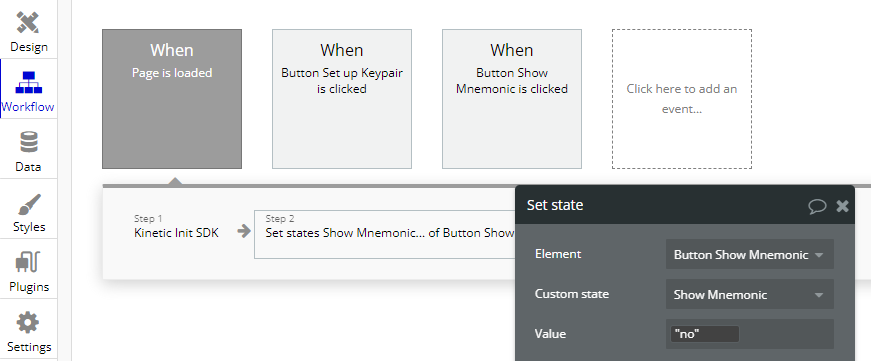
-
Go back to your 'When Button Show Mnemonic is clicked' workflow and add an action via
Element Actions / Push a Kinetic Local Storage. Set your element toKineticLocalStorage Mnemonicand keys to a Dynamic Value ofKineticLocalStorage Public Key's Values:last item.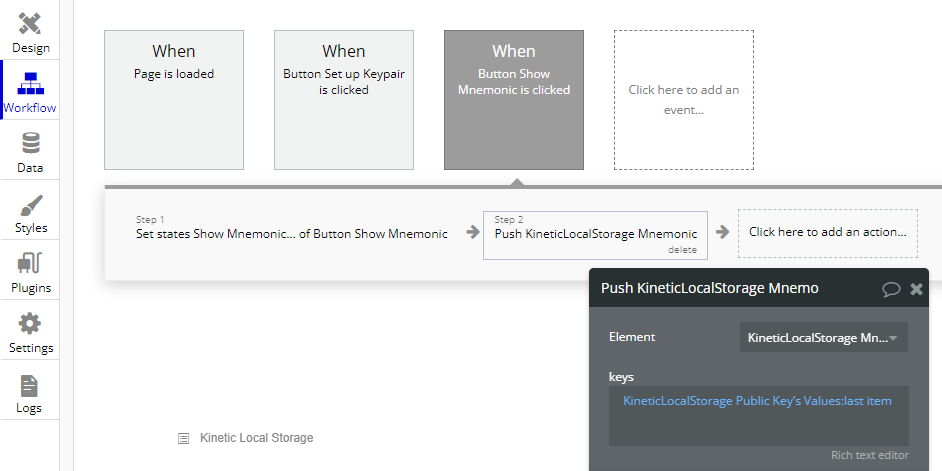
-
Finally, go to 'Design' and click your Text Mnemonic, then select 'Conditional' and 'Define another condition'.

-
We will use the state on the button we just created. Set 'When' to
Button Show Mnemonic's Show Mnemonic is "yes", and 'Property to change when true' toThis element is visibleand set the checkbox to true.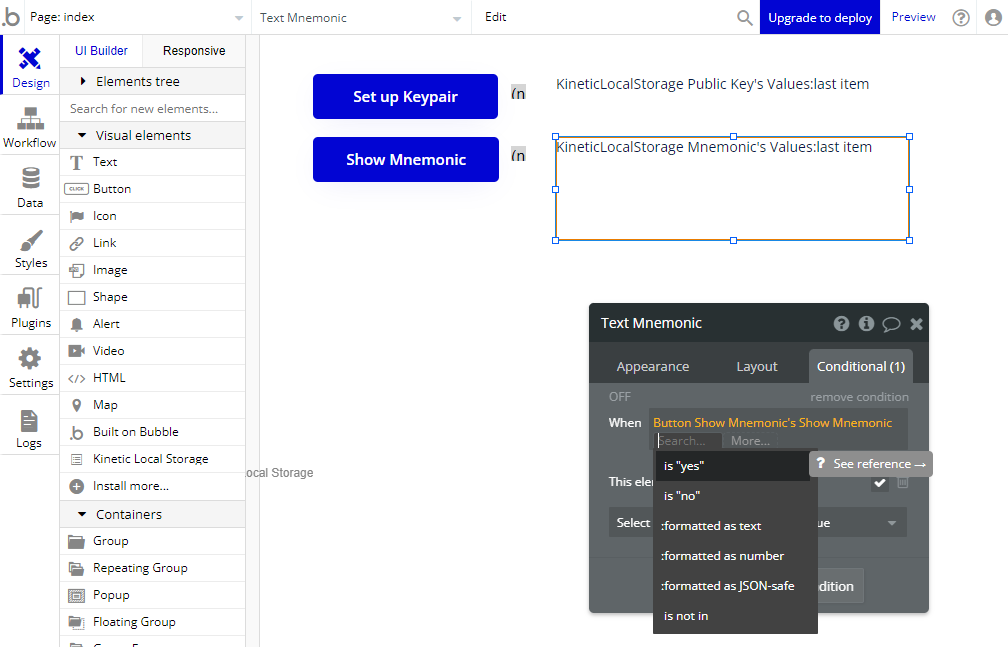

Phew!
-
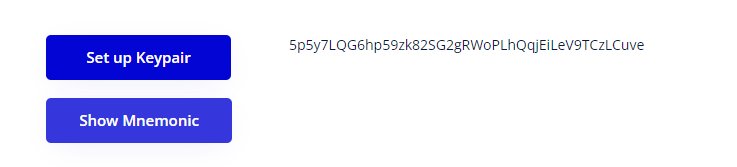
Reload your 'Preview'. Now you'll be able to view your mnemonic when you click on the 'Show Mnemonic' button (as long as you've previously set up your Keypair, otherwise you'll get an error).

Set Up Keypair From Mnemonic
So, what if you've stored your Mnemonic and want to be able to make your Keypair from it? Let's set that up now!
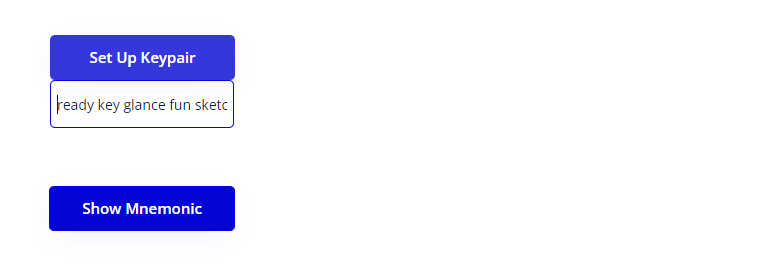
- In 'Design', Drag an 'Input' from the below your 'Set Up Keypair' Button. Rename it to
Input Mnemonicand set the 'Placeholder' toFrom Mnemonic...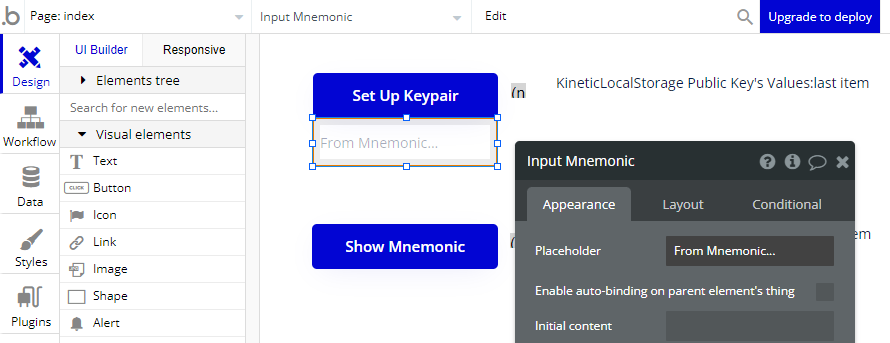
- In 'Workflows', select 'When Button Set Up Keypair is clicked' and click on 'Step 1 - Kinetic Setup Keypair'. Add the value of 'mnemonic' as a dynamic value set to
Input Mnemonic's value.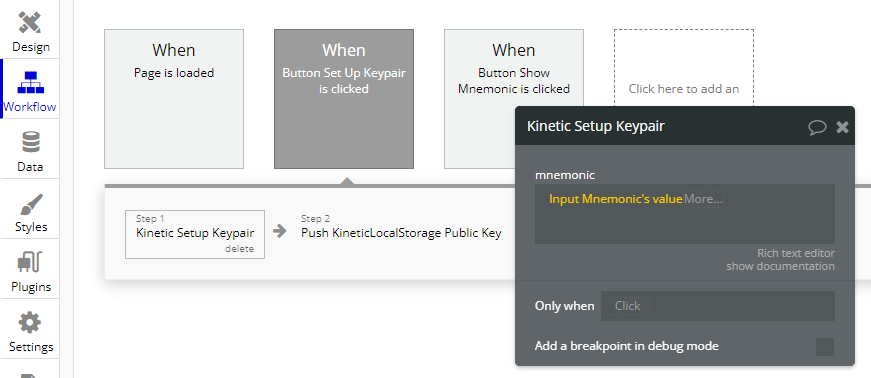
Let's see if that worked.
- In 'Preview', show your mnemonic and save it somewhere. Then, in the developer tools, right-click on your Local Storage for the Preview and select 'clear'. You'll notice all of the values disappear. Then reload the page.
- Type your saved mnemonic into the input and click 'Set Up Keypair'.
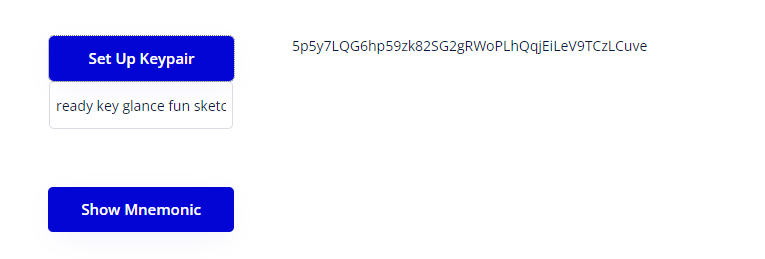
- You'll see that the same Public Key you had before has been generated, meaning you'll be able to use the same account on the blockchain, even if you change browser or delete your history! Speaking of accounts on the blockchain...
Creating your Account
- In 'Design' add a new Button called 'Button Create Account' with the text 'Create Account'.
- Click 'Start/Edit workflow' and add an action via
Plugins / Kinetic Create Account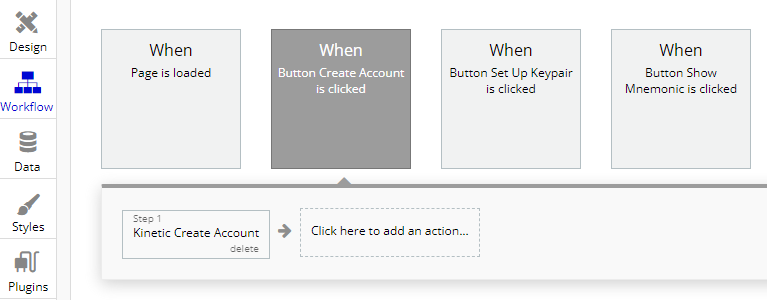
That's it!
- Go to your 'Preview', reload, 'Set Up Keypair', then 'Create Account'. You'll see the loader at the top of the screen start to go and then once it completes you'll have some new data in your Local Storage.

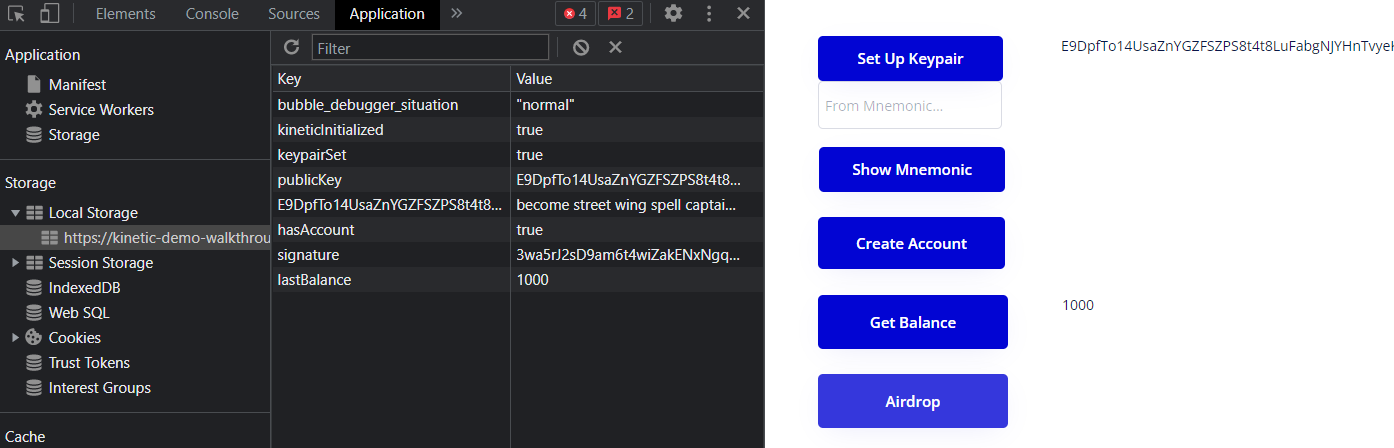
- The new data in Local Storage is
hasAccount = trueand something likesignature = 31CB6e5ufkFJG6...A9ygEYrgWExK8i - The
signatureis the transaction signature for the Create Account action on the blockchain. Go to Solana Explorer and paste in the signature to see your transaction on the blockchain! - We can use the
hasAccount = truevalue to indicate to users when an account has been found on the blockchain. - E.g. In these status indicators from the Demo app linked above:
- We can use Kinetic Local Storage elements and push the values from the browser's Local Storage to display them on the screen, just like we did with the Public Key and the Mnemonic.
- To see how it was done in the Demo App, have a look here
- Can you implement something similar in your own app?
Check Balance
Now we have an Account, lets check our Balance!
- In 'Design', add a new Button and rename it to
Button Get Balancewith the textGet Balance. - Add a Kinetic Local Storage element next to it and rename it to
KineticLocalStorage Balance. - Add a Text element and rename it to
Text Balance. Set the value toKineticLocalStorage Balance's Values:last item - Go to
Button Get Balanceand select 'Start/Edit workflow'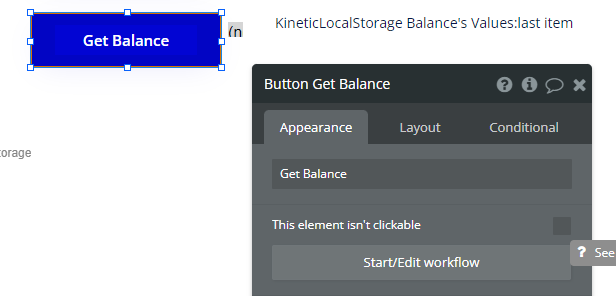
- Add an action via
Plugins / Kinetic Get Balance. - Add another action via
Element Actions / Push a Kinetic Local Storage. - Set your element to
KineticLocalStorage Balanceand keys tolastBalance.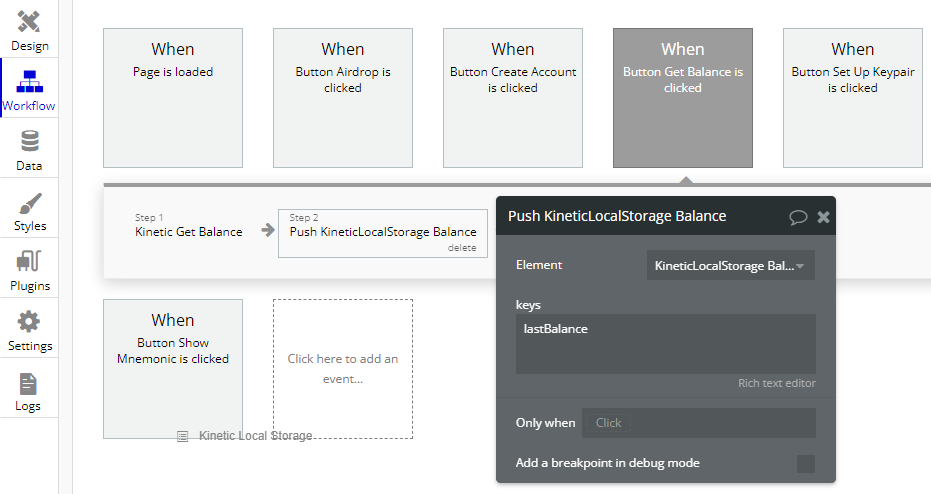
- (P.S. ignore the Airdrop workflow you can see in the above image for now... We'll get to that in a second!)
That's it!
- Go to your 'Preview', reload, 'Set Up Keypair', 'Create Account', then 'Get Balance'.
Woo! You have 0 Kin!!! Congratulations!!!!!!!!!
Airdrop Funds (devnet)
Now we can add some funds to your account so you can start transacting. On devnet we can do this via an Airdrop.
- In 'Design', add a new Button and rename it to
Button Airdropwith the textAirdrop. - Go to 'Start/Edit workflow' and add an action via
Plugins / Kinetic Request Airdrop. Set the 'amount' to1000.
After completing the Airdrop, we'd like to update the balance. So...
- Add another action via
Plugins / Kinetic Get Balance. - Add another action via
Element Actions / Push a Kinetic Local Storage. - Set your element to
KineticLocalStorage Balanceand keys tolastBalance.
We're done!
- Go to your 'Preview', reload, go through the Keypair / Account steps, then Airdrop yourself some lovely Kin! See that balance soar...
Transfer Kin
Now for the real stuff! We're going to send some of our Kin to another Account.
- In 'Design', add a new Button and rename it to
Button Send Kinwith the textSend Kin. - Add two inputs.
Input Send Kin Amountwith 'Placeholder'Amountand 'Content format' totext (numbers only). AndInput Send Kin Destinationwith 'Placeholder'Destination. - Add a Dropdown named
Dropdown Send Kin Transaction Type. Set the 'Placeholder' toTransaction Typeand the 'Choices' toNone, Spend, Earn, P2P. These must be exact. You can use these transaction types to mark your transaction depending on whether they are payments from an app to a user (Earn), a user to an app (Spend), or user to user (P2P).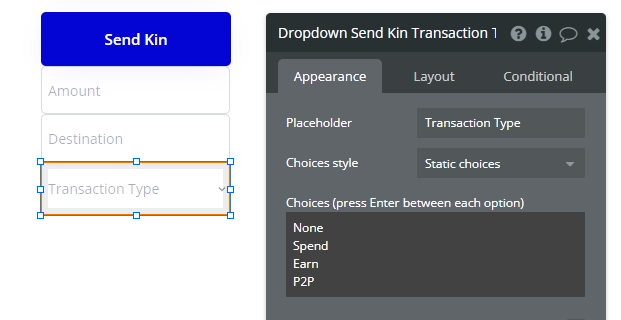
- Click the 'Send Kin Button' and go to 'Start/Edit workflow'.
- Add an action via
Plugins / Kinetic Make Transfer. - Set 'destination' to a dynamic value of
Input Send Kin Destination's value - Set 'amount' to a dynamic value of
Input Send Kin Amount's value - Set 'type' to a dynamic value of
Dropdown Send Kin Transaction Type's value. Learn more about Spend, Earn and P2P in our Terms and Concepts page.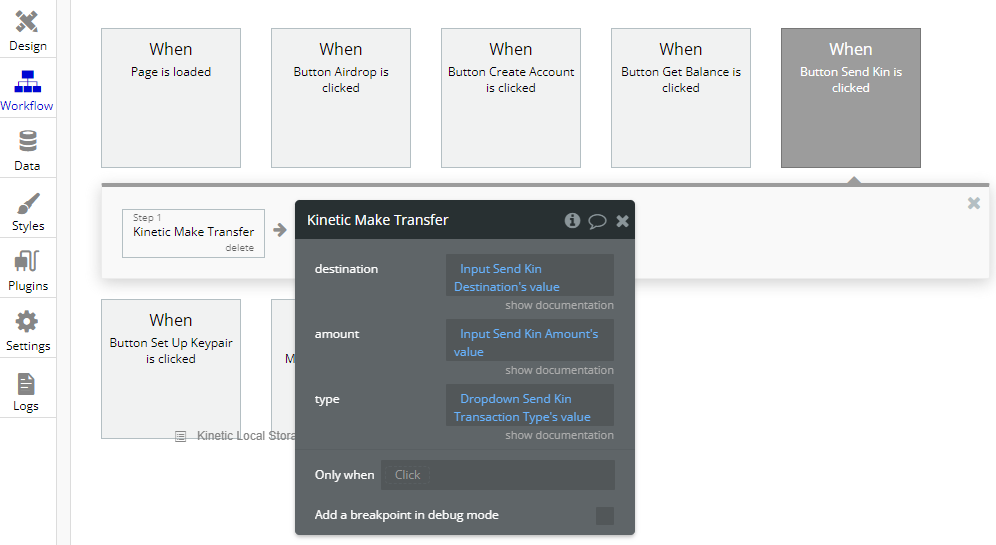
Again, after completing the Transfer, we'd like to update the balance.
- Add another action via
Plugins / Kinetic Get Balance. - Add another action via
Element Actions / Push a Kinetic Local Storage. - Set your element to
KineticLocalStorage Balanceand keys tolastBalance.
We're done!
- Go to your 'Preview', reload, go through the Keypair / Account steps, then Airdrop. Once you've got some Kin, try sending some of it to another address.
- E.g.
7ssR45gXV2qnxP2nQy9sUVngLCoyDP4r22yugbGghyjy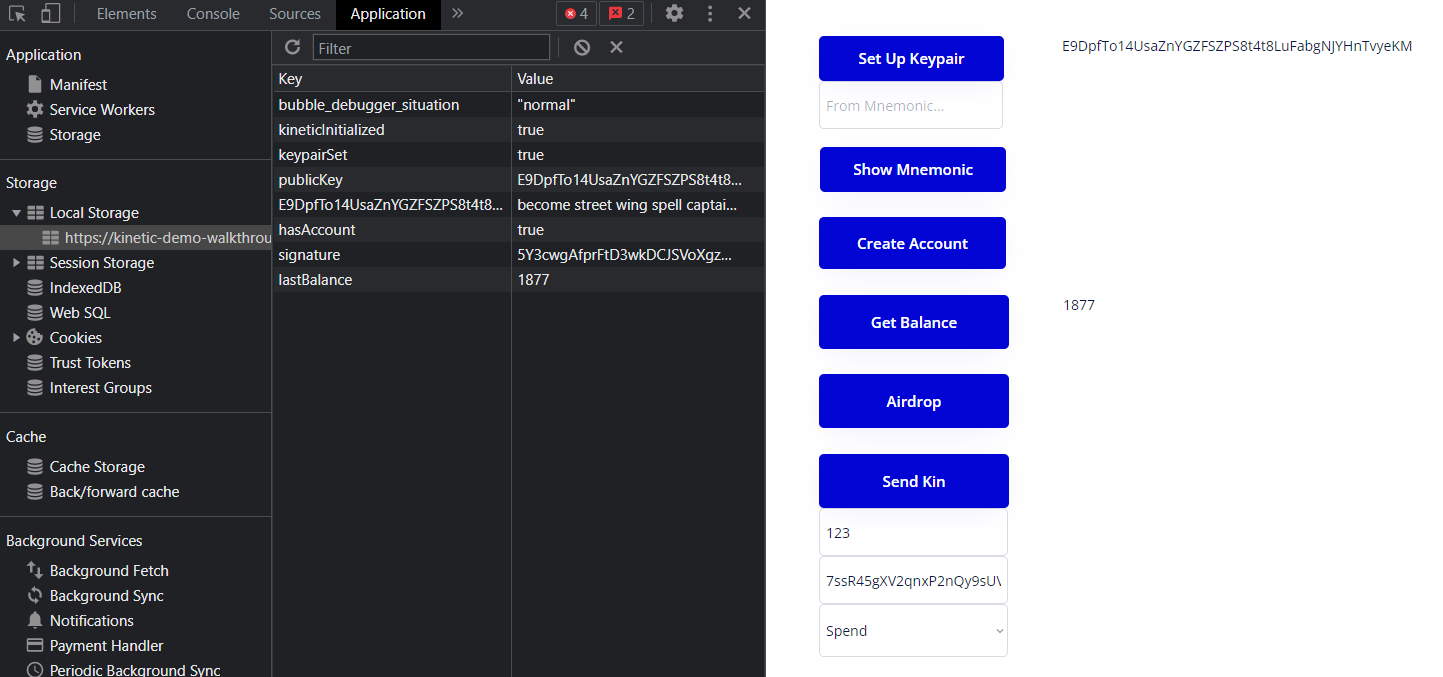
Get Transaction Details
Now, we're going to use the e.g. signature = 31CB6e5ufkFJG6T32wXS5TpKhiTCPWE95seproArPhjmdBGJKJBfiyoxHohGeEFPerVmi7yXxEA9ygEYrgWExK8i that we can see in the browser Local Storage to get more detailed information about a transaction.
- In 'Design', add a new Button and rename it to
Button Get Transactionwith the textGet Transaction. - Add a Kinetic Local Storage element next to it and rename it to
KineticLocalStorage Transaction. - Add another Kinetic Local Storage element next to it and rename it to
KineticLocalStorage Signature. - Add a Text element and rename it to
Text Transaction. Set the value toKineticLocalStorage Transaction's Values:last item
- Go to 'Button Get Transaction' and select 'Start/Edit workflow'
- Add an action via
Plugins / Kinetic Get Transaction. Set the 'signature' to a dynamic value ofKineticLocalstorage Signature's Values:last item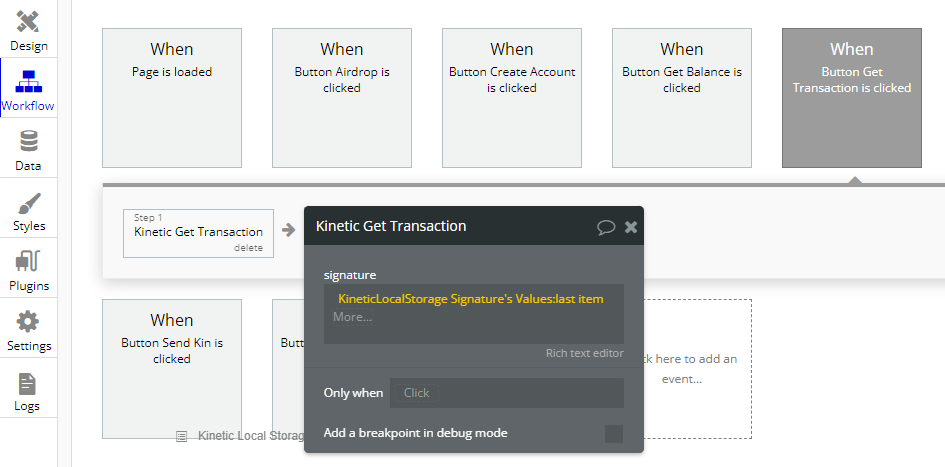
- Add another action via
Element Actions / Push a Kinetic Local Storage. - Set your element to
KineticLocalStorage Transactionand keys totransactionDetails.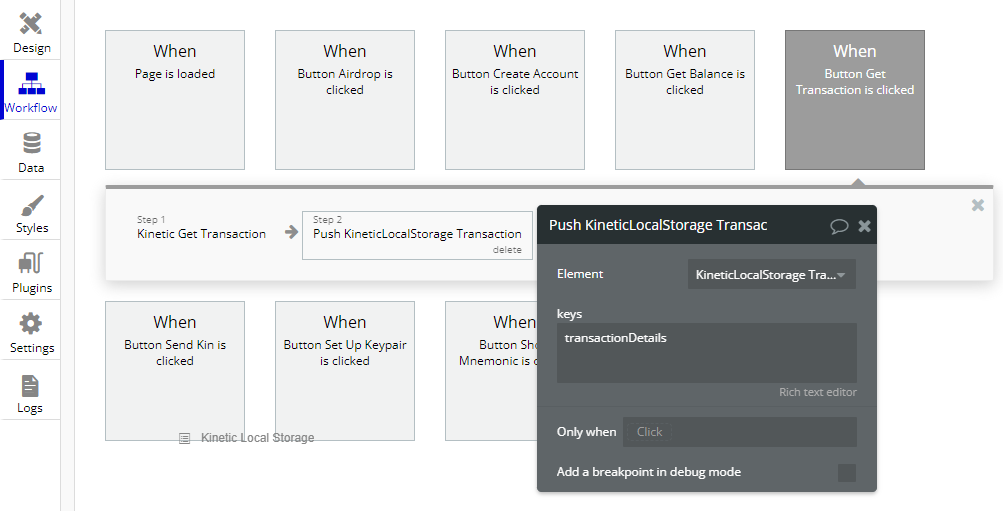
Nearly done!
- To the Create Account, Aidrop and Send Kin Workflows, add an action via
Element Actions / Push a Kinetic Local Storage. Set the element toKineticLocalStorage Signatureand keys tosignature. You can copy and paste actions in Bubble so you don't have to do the same thing three times.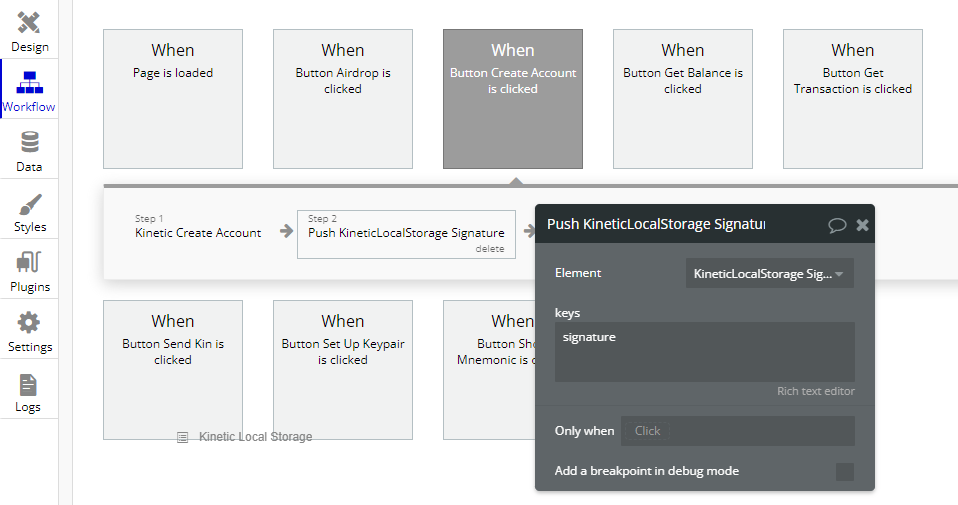
That's it!
- As you carry out transactions on the blockchain, you can click 'Get Transaction' to see more details of the latest one you've made.
- Can you extend this section so you can get transaction details for any signature? (Hint: you're going to need an input...)
Get Account History
Lastly, we're going to use Kinetic to get the history of an account.
- In 'Design', add a new Button and rename it to
Button Get Historywith the textGet History. - Add a Kinetic Local Storage element next to it and rename it to
KineticLocalStorage History. - Add a Text element and rename it to
Text History. Set the value toKineticLocalStorage History's Values:last item
- Go to 'Button Get History' and select 'Start/Edit workflow'
- Add an action via
Plugins / Kinetic Get History. - Add another action via
Element Actions / Push a Kinetic Local Storage. - Set your element to
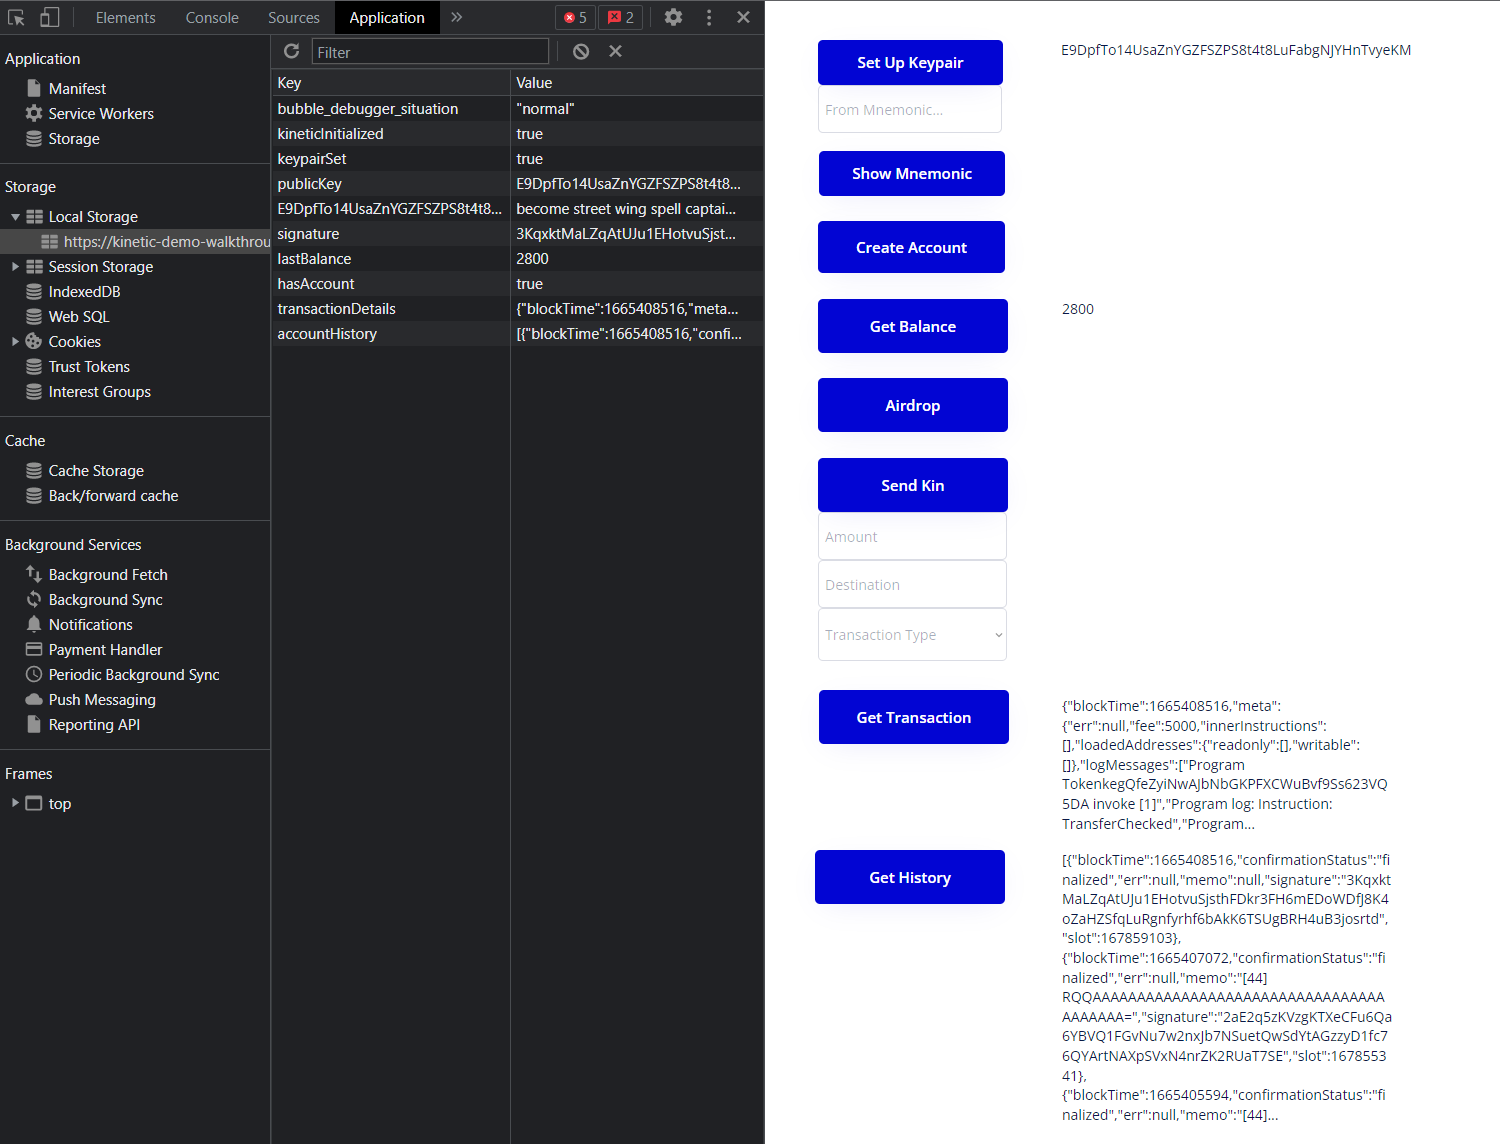
KineticLocalStorage Historyand keys toaccountHistory.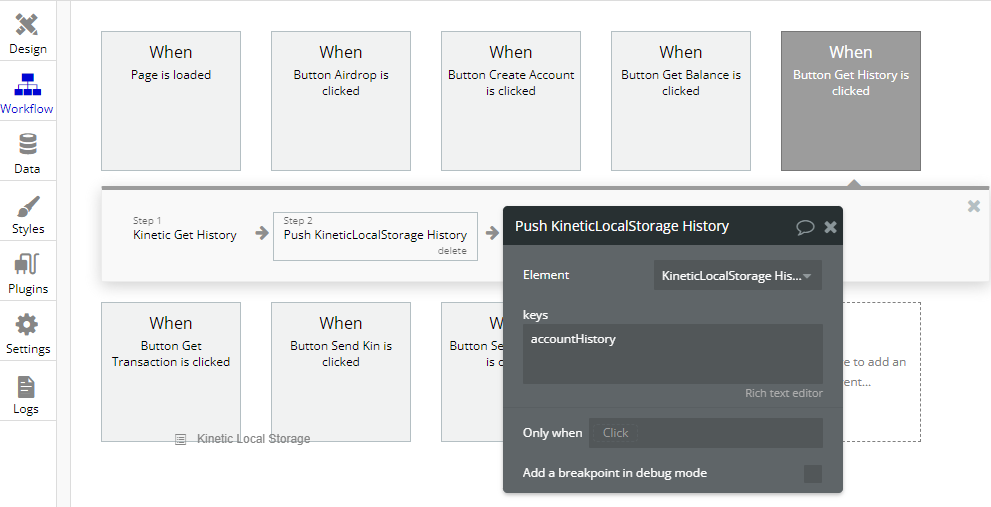
Finished!
- Go to your 'Preview' and try clicking 'Get History'.
Congratulations on making it this far! You can now carry out all of the actions of the Kinetic Plugin and display that data in the browser. Awesome!
Now, we don't claim to be experts in how Bubble works, so I'm sure there are many more elegant ways to implement the UX for a Bubble app than we've shown here. But this should be a solid starting point for anyone wanting to work with Kin via Bubble. Happy building!
Commitment
You can set a global commitment level in the plugin settings page or specify commitment when creating accounts or transferring Kin.
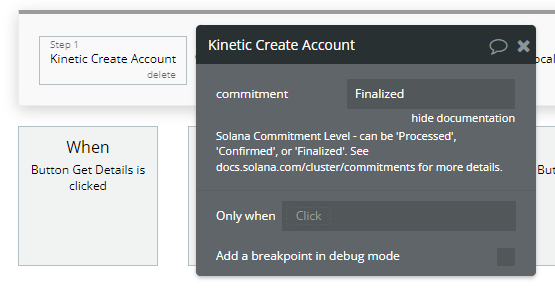
The available options are:
- Processed : Transaction has started the process of completion. Quicker but less certain. Has possible edge cases, e.g. you can't send Kin to an account that hasn't been 'Finalized'.
- Confirmed : Transaction is not complete but is almost certain to do so
- Finalized : Transaction is finalized on the blockchain. Certain but slower.
The default is 'Confirmed'.
Something for app developers to consider!
Learn more about commitment here.
Error Handling
If an error occurs with a Kinetic transaction, you'll see a value in local storage called error with the value being the method that failed. You can use this to drive your UI and let users know if an error has occurred.
Demos and Starter Kits
Created to help get you up and running as quickly as possible, these projects can be a great reference point when you get stuck or even a starter for your own project. Happy coding!
Kinetic Bubble Demo
Check out a simple demo app built on Bubble that can interact with Kin on the Solana blockchain.
Behind The Scenes
Check out the workflows, conditional logic etc used to build the Kinetic Bubble Demo app.
Ready for Production?
To transact for real on Solana, you'll need to connect to a Kinetic instance that support mainnet.
You can do this in two ways:

Kinetic As A Service
Connect to a Kinetic Service hosted by a 3rd party.

Self Hosted
Host and manage your own Kinetic instance.
Once you've got access to mainnet via Kinetic, you can change your plugin settings.
Kinetic Plugin Mainnet Settings
endpoint - 'https://your_kinetic_endpoint.com'
environment - 'mainnet' // the name of your mainnet environment
index - 'your app index'
Earn Kin via the KRE

Kin Rewards Engine
Earn Kin by using it in your App
What If I Get Stuck?
Pop into the kinetic-bubble channel on Discord and we'll give you a hand.

Getting Help
Stuck? No problem, we have an amazing community waiting to help out.
Developer Discord
Join our fantastic developer community.
Developer Best Practices
Once you're ready to code, have a quick look at our Developer Best Practices where we cover some useful topics that you'll want to keep in mind as you build out your Kin application.

Best Practices
Some key information you'll want to keep in mind as you develop your App
Was this page helpful to you?
Provide feedback
